The First of Summer’s Salads

Although it may not be official until next Tuesday, it already feels like summer is here in NYC! Especially in the summer, I love to put together big batches of salads and salsas to eat all week long. This version is a modified horiatiki made with:

  • Pint of cherry tomatoes, quartered
  • 1 cucumber, chopped
  • Block of feta chopped or crumbled
  • 1/4-1/2 red onion, chopped
  • 1/3 cup mixed pitted olives, roughly chopped
  • Handful fresh chopped basil

Really your salad could be a combination of anything – this version could be complemented with a can of white cannellini beans (or garbanzo) or fruit, such as chopped watermelon. However you decide to make it, for me summer is all about fresh ingredients and convenience – both of which can be found inside a mixing bowl in the fridge!

Posted in Culinary Adventures | Tagged , , , , , , , | Leave a comment

Only in NYC…

While walking home from the office at the ungodly hour of 10:30PM, I walked by Roseland Ballroom while they were in the process of breaking down a private event held earlier in the evening. Outside there was a guy stuffing literally hundreds of beautiful blue hydrangea blooms into giant black trash bags. After asking the 1st most important question, “are the real”? (Yes) Followed by, “Can I have some”? (shrug)

This is how you end up with a free bouquet on your walk home:

I popped them into one of my favorite cool-casual vases, an old Pom Tea glass, back from when it first launched and came in real glasses with pop-bottle tops!

Posted in Feathering the Nest, Musings | Tagged , , , | Leave a comment

Did that say Reindeer?

I’ve talked before about AHALife and what a cool company it is. I still delight in seeing what interesting product they feature everyday. Today when I saw “Reindeer Leather” in my email I thought my eye had to be playing tricks on me!

No tricks, that’s a bark-tanned reindeer leather apron sold in an extremely limited edition (only 30 will be made) from Böle, a fourth generation tannery and saddle maker in Sweden. Apparently reindeer skin is strong, lightweight and incredibly durable and “bark-tanned” means the leather is cured in vats filled with spruce bark for nearly a year.

While quite cool and unique, at $840 it won’t be this year’s “perfect Father’s Day present”!

Posted in Musings | Tagged , , , , | Leave a comment

Po’ Boy Re-Do

I love re-inventing leftovers. I usually find that I get as much, if not more, satisfaction out of crafting a meal from meager beginnings than I do creating a luscious meal from scratch! Honestly this re-do was hardly a re-invention, but it was delicious!!

It all started with half of a leftover Blackened Catfish Po’ Boy with Sweet Potato Fries from Brother Jimmy’s BBQ:

While replacing the now-stale French bread was the primary objective, the whole sandwich looked pretty sad:

The first step for reinvention was the bread. I reached for a Fresh Direct frozen Par-baked Rosemary Ciabatta Roll, which cooks in the toaster oven in only 10 minutes! Par-baked really is the best because you can have delicious fresh bread whenever you want without rushing to the market or worrying about it going stale! In this case the Rosemary Ciabatta elevated my sandwich, and was the perfect size for lunch!

Not only did I transfer the tomatoes and catfish over to my new roll (they were warmed in the microwave first), I also scraped the old French bread for a good smear of the Cajun Mayo. To balance my mayo inclusion I also added fresh Boston Lettuce. You can see some of the leftover wilted shredded lettuce stuck to the catfish above, clearly this sandwich needed more green.

Even the sweet potato fries got a little refresh in the toaster oven. I made a little tin-foil pouch (my preferred method of baking fries, always) and baked them at 400 for about 10 minutes until they were warm and had a little bite back – no one likes soggy fries!

Two simple substitutions plus a little extra care in the preparation and I had, seriously, the best leftover lunch in recent memory – maybe even better than the original Po’ Boy!

Posted in Culinary Adventures | Tagged , , , , , , , , , , | Leave a comment

Burritos, my way

I’ve noticed a pattern: most of my favorite “what can I make using only what’s in the fridge” meals are burritos! I really do think it’s the most versatile vessel – which is probably why I always keep tortillas in the fridge! Beyond the tortilla, I believe what makes a burrito successful is the mix. By mix I mean the proportion of wet and dry ingredients. See my basic formula, and my latest creation below!

Basic formula for burrito perfection:

  • 1 part protein
  • 1 part vegetable
  • 1 part cheese
  • 1 part dry
  • 1 part wet

This burrito’s recipe in the equation above:

  • 1 egg scrambled with 2 Tbs Salsa
  • 1/3 cup leftover boiled fresh corn
  • 1 deli slice of monterey jack cheese, chopped
  • Handful of sweet potato fries, baked
  • 3 Tbs additional Salsa

I’m almost as particular about the order of assembly as I am about the proportions. The other great thing about this dish is it’s all one pan!

I always start by sauteing the protein and main veggie together to get it nice and warm, as well as browned. In this case I was using an egg as my protein (with 2 tbs salsa for extra flavor) and leftover boiled fresh corn as the veggie.
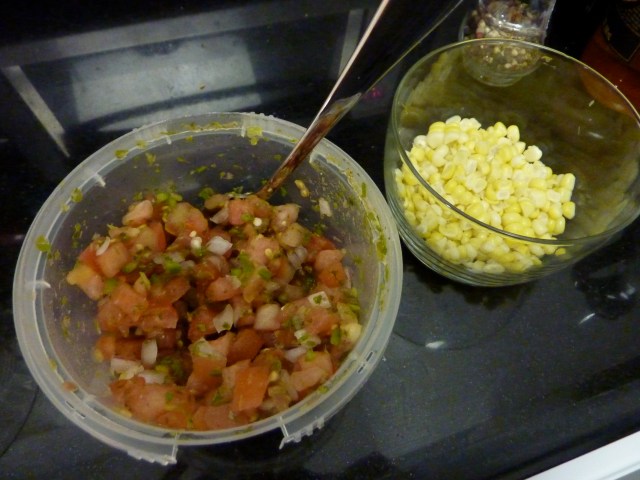
Before I even get these get started in the pan, I’m also baking frozen sweet potato fries in a tin-foil pouch in the toaster oven. I usually bake for 15 of the 20 recommended minutes. I also chopped up 1 slice of deli cheese.

This is the real method to my madness – the protein and veggie get cooked first and the cheese, dry and wet ingredients get added right at the very end.

My favorite tortillas are La Tortilla Factory Smart & Delicious Large Whole Wheat Tortillas, introduced to me by Sarah! The trick to a great burrito is to heat the tortilla first, which helps it fold and just taste better. My preferred way is to heat it is right on the burner for a few seconds, flipping constantly. This is also a great way to start a fire so don’t walk away!

It’s very easy to make too much mix for your tortilla. I pride myself about getting much better about proportions (otherwise you get leftover of your leftovers)!
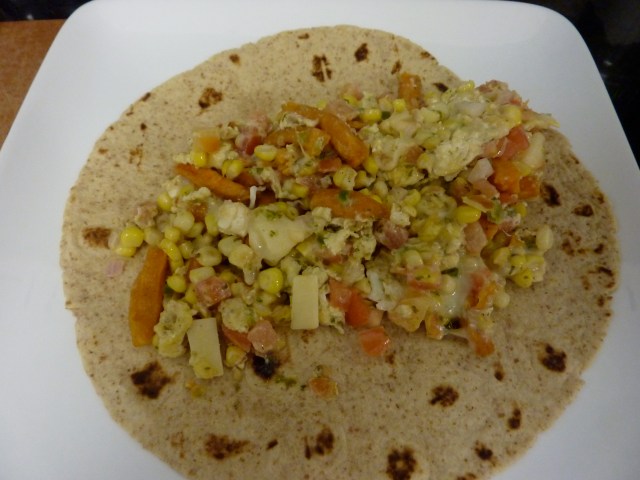
If you don’t have great burrito-rolling skills, try it with a piece of tinfoil around the outside. Just make sure to not to roll the tinfoil into the burrito! The tinfoil is also a great trick to help your burrito travel, and it definitely makes it easier to pick up and eat!
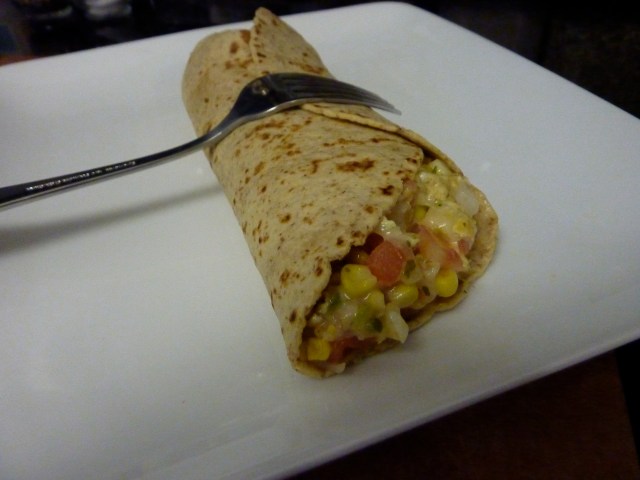
This burrito recipe can be adapted in pretty much infinite ways using the same equation. Here are some of my favorite ingredients:

  • Protein: 1 Egg, half a chicken sausage link, sliced deli meat, shredded leftover chicken, shrimp, black beans – anything!
  • Vegetable: Really anything
  • Cheese: I like every burrito to have cheese becuase I think it’s needed to bind everything together, otherwise you have a mess! Also, I really like cheese.
  • Dry: Rice, any version of potato (fries, roasted, tater-tots) anything that will absorb some liquid so you don’t have a drip issue
  • Wet: Salsa is really the way to go here, it is a burrito after all! But, you could use a dollop of sour cream or even a drizzle of your favorite salad dressing to go in a different direction

After such a well balanced meal it’s hard to imagine desert – which is why I like to go for something like a sliced pear. You get the sweet taste I know I crave, and it feels so much more substantial eaten off a plate with a fork!

Posted in Culinary Adventures, Tips & Tricks | Tagged , , , , , , , | Leave a comment

Orchids in Bloom!

Last October, for my birthday, my friend Kate gave me a beautiful orchid that sustained its blooms all the way through February of this year! When the last bloom finally fell off I have to admit I was quite sad. Although my parents are constantly bringing orchids back to bloom I was convinced I could never be so lucky. Despite my bad attitude, I went ahead and cut off the stem below the last bloom, per my mother’s instructions, and near immediately a new stem extension started growing! Finally, a full 10 weeks later, my orchid is back in full bloom!

The first 4 blooms popped so fast! The photo below was taken before bed and the photo above was taken in the morning.

As you can see my new blooms are growing crazy, all over the place with one bloom backwards, but who cares?! I’m delighted to have flowers back, and may even love them more now that they arrived as a result of my care.

While my orchid botany skills are still rudimentary at best, I hope my success encourages you all to tend your plants with care and hopefully you will be rewarded with new blooms also!

Posted in Feathering the Nest, Tips & Tricks | Tagged , , | 1 Comment

1 if by land, 2 if by lantern?

How come it seems everyone is encouraging me to buy lanterns this year? All of a sudden every catalogue I receive showcases intricate lanterns on their cover, all drawing me to a seaside escape or vast patio that are far from my reality here in New York City. While I did consider an investment for use as a dining-table centerpiece, I’ve decided that it’s best to let lanterns live in fantasy. So, here is a compilation of all of the awesome ways you can diffuse light at your yet-to-be-realized summer-time escape!

Pottery Barn: Garrison Windowpane Lanterns, $30-95

Restoration Hardware: Santorini Square Lanterns, $20-110

West Elm: Wire Lanterns, $50-58

CB2: Camp Lantern, $24.95

Crate & Barrel: Knox Lantern, $34.95

Wisteria: Square Glass Lanterns, $99-119

Pottery Barn: Casablanca Filigree Metal Lanterns, $47-79

Anthropologie: Driftwood Hurricane, $38

Although not really outdoor inspired, I have to share this awesome tabletop lantern I found at Wisteria:

Wisteria: Tabletop Coach Lantern, $149

And if you’re going to bring light outside why not step up from candles to fire? Restoration Hardware has a whole collection of fire tables, columns, bowls and troughs that run on Citronella gel fuel – now that looks like an escape to me!

Posted in Feathering the Nest, Musings | Tagged , , , , , , | Leave a comment

Possibly my favorite meal

With spring finally in full swing I had my friend Cat over for a fun catch-up dinner. The menu was very simple and may, seriously, be my favorite meal ever! (At least for spring!)

Although I originally intended to stagger the meal into courses, hindsight allows me the opportunity to say that it really was better all together! To start I made an Asparagus and Gruyere tart with very minimal adaptations of this Martha Stewart recipe served with a very light baby-arugula salad. The only major change is that I only used 1 sheet of Pepperidge Farm Puff Pastry, which makes a 10″ square and only requires 1.5 cups max grated cheese and 1 bunch of asparagus. Cat and I both agreed that Gruyere is the perfect cheese for this tart – I would avoid any substitutions if at all possible!

The main we shared is one of my favorite dinner party dishes – mussels! I just love sharing from a communal bowl and the fun that slightly-messy eating with your hands can bring! My standby recipe is another of Martha’s, which I accompany with lots of good crusty bread to eat up all the amazing broth!

Although we certainly didn’t need any more food, we finished the meal with the most delectable treats from The Sullivan Street Bakery that were devoured before we could remember to take a picture! Such a simple and easy (not to mention affordable) dinner that felt like an incredible extravagance – can’t ask for much more than that!

Actually, how about the world’s best leftover’s the next night? Even better!

Posted in Culinary Adventures, Entertaining | Tagged , , , , , , , , , | Leave a comment

First Pesto!

Fresh pesto is one of my favorite summer staples. Although spring’s basil is a little bitter, impatience got the best of me and I just had to make up a batch!

I have the small Cuisinart 4-cup food processor below. Although you admittedly will have to work in batches, it does just fine. If you have a full size processor certainly use it.

Like most all-time favorite recipes, I do not measure any of the ingredients while I make my pesto. Maybe at some point this summer I’ll take the time to measure everything out but for now these are all absolute guess-timates!

  • 1/4 cup pine nuts
  • 4 large garlic cloves, peeled
  • 1/3 cup grated Parmesan cheese
  • 4 cups fresh basil
  • Lots of olive oil
  • Salt & pepper
  • Essential Tool: Silicone Spatula

Start with your garlic cloves in the processor, give them a good whirl until diced then use your spatula to wipe down the sides (try to wipe down the sides of the bowl after each round). Next add 1/4 cup pine nuts and give it another whirl. The pine nut and garlic combination should look like it’s on it’s way to becoming a paste. This is where my sketchy measuring starts – add a swirl of olive oil to your processor, about 2-3 Tbs for this first one, 2 Tbs per swirl moving forward. Your mixer should look like this:

Next, add your fresh basil in 3-4 increments of about 1 cup each. Although it may seem like a pain adding the basil incrementally I promise it really will save you frustration down the line. Because you’re asking this little processor to work very hard you need to make sure the bowl isn’t too packed so the ingredients can combine easily. Between rounds of basil add another 2 swirls of olive oil. You’ll see it’s needed to keep your pesto smooth and your processor working as it should.

The last step is to add Parmesan cheese and salt and pepper to taste. This is also when you’ll judge if any additional olive oil is needed, although try to default to less becuase you can always add but can’t ever take away!

This recipe will make 1 cup of pesto, which I keep covered in the fridge for about a week. The garlic does admittedly come through a little heavy handed, so feel free to only use 2 cloves. Alternatively, I knew that I would mostly be heating this pesto and eating it warm, which mellows the garlic significantly. So, when deciding how much to use, keep in mind if you will be primarily eating it raw or warm before you make your garlic judgment.

Speaking of cooking with pesto – your options are nearly endless! Here are just a few of the ways that I used this batch of pesto. While all are pretty standard, consider more inventive uses such as in paninis or wraps (or any sandwich), as a base for hors devours (think bruschetta) or even as a marinade/rub!

Posted in Culinary Adventures | Tagged , , , , , , , | Leave a comment

Rainy Day Cream Sauce

I have always loved Alfredo sauce, ever since I was a kid. For that reason, the day I discovered I could make a quick cream sauce out ingredients I almost always have on hand, I was ecstatic! All you need is:

  • 1.5 Tbs Butter
  • 1 Tbs White Flour
  • 1/3 cup Milk (any kind, I keep 1% on hand)
  • 4 Peeled whole garlic cloves, halved if large (technically optional)
  • 1/4 cup Parmesan Cheese (optional but delicious)

The quantities above are for a big single serving and are estimated. Although it may take a few practice attempts to get this sauce nailed, I hope you’ll find that you can eye-ball the and it still comes out delicious every time!

First melt your butter in a medium saucepan and toss in the garlic. We basically are flavoring the butter so once it just starts to brown remove the cloves and move on to the next step. Be careful not to have your stove too hot or the butter will brown before the garlic flavor can get infused in! This is also when I add Salt and Pepper although you can wait until the very end if you prefer.

From this point on you want to have a whisk glued to your right hand. I like the flexible rubber kind becuase they can get into the corners of the pan. Start by adding 1 Tbs of flour, sprinkling and whisking the whole time. This creates a roux.

Next you add in your milk, again pouring and whisking constantly. Immediately add cheese (if using) right after the milk. Now you keep whisking, and whisking, and whisking until the sauce finally becomes thick (usually about 3 minutes but it feels much longer when you’re whisking).

Ta-da your sauce is done!

Hopefully you have been cooking your pasta this whole time so you can get right to enjoying your meal! One trick I love is to blanch your choice of veggies in the boiling pasta water (pre-pasta) for about 5 minutes first.

Then add your pasta (whole wheat bow-ties for me!)

And finally you have a meal fit for a hungry king!

Posted in Culinary Adventures | Tagged , , , , , | Leave a comment